Harnessing the Power of Solana Web3: A Comprehensive Guide to Integrating Solana Web3.js in Your DApp
Decentralized applications (DApps) are revolutionizing the blockchain industry, and the Solana ecosystem is at the forefront of this movement. As a high-performance blockchain, Solana has become increasingly popular among developers looking to build scalable and user-friendly DApps. One of the key components in achieving this is the seamless integration of Solana Web3, a JavaScript library that enables developers to interact with the Solana blockchain.
In this comprehensive guide, we will dive deep into the world of Solana Web3, exploring its various features and components. From setting up your development environment to managing accounts and handling transactions, we’ve got you covered. By the end of this article, you will be well-equipped to harness the power of Solana Web3 and build your next DApp masterpiece.
Understanding Solana Web3
Solana Web3 is a JavaScript library that provides developers with a simple and efficient way to interact with the Solana blockchain. It offers a set of tools and features that make it easy to develop DApps on the Solana network. Some of the main components of Solana Web3 include:
- Solana Web3.js: The core JavaScript library that provides an interface to interact with the Solana blockchain.
- @solana/web3.js: The official Solana Web3.js package that can be easily installed and integrated into your project using NPM (Node Package Manager).
- Solana Web3 Connection: A feature that allows developers to establish a connection with the Solana blockchain and send/receive data.
- Solana Web3 API: A collection of API endpoints and functions that enable developers to perform various actions on the Solana network.
Setting Up Your Development Environment
Before you can dive into the world of Solana Web3, it is essential to prepare your development workspace. This involves a few steps to ensure that your environment is set up correctly and that you have the necessary tools installed. Here’s a brief overview of the process:
- Install Node.js: Node.js is a runtime environment that allows you to run JavaScript outside of a browser. It is required to work with the Solana Web3.js library. Visit the official Node.js website and download the latest version. The installation process will also include NPM (Node Package Manager), which is used to manage and install JavaScript packages.
- Create a project directory: Organize your project by creating a dedicated folder or directory. This will help you keep your project files and dependencies in one place.
- Initialize your project: Once you have created a project directory, use the command line to navigate to it and run npm init. This command will create a new package.json file, which stores information about your project and its dependencies.
- Install Solana Web3.js: With your project set up, you can now install the Solana Web3.js library by running npm install @solana/web3.js. This command will add the library to your project’s dependencies, making it available for use in your JavaScript code.
Establishing a Connection with the Solana Network
To enable seamless interaction with the Solana network, it is vital to establish a connection with the blockchain. This process involves creating a new instance of the Connection class, which is provided by the Solana Web3.js library, and specifying the appropriate network’s RPC endpoint. Here’s a high-level overview of how to connect to the Solana blockchain:
- Import Connection and clusterApiUrl: Begin by importing the Connection and clusterApiUrl objects from the Solana Web3.js library.
- Select a Solana network: Solana offers three networks to choose from: mainnet, testnet, and devnet. Select the network that best aligns with your development and deployment needs.
- Obtain the RPC endpoint: Utilize the clusterApiUrl function to retrieve the RPC endpoint for the chosen network.
- Create a connection instance: Instantiate the Connection class using the obtained RPC endpoint. This connection instance will serve as your gateway to interacting with the Solana blockchain.
- Upon completing these steps, your application will be successfully connected to the Solana network, allowing you to leverage the various features and components provided by the Solana Web3.js library.
Working with Accounts in Solana Web3
Accounts play a crucial role in the Solana blockchain, storing essential information such as public keys, private keys, and balances. Solana Web3 provides an easy way to create and manage these accounts without needing to write complex code. Here’s a general overview of the account management process:
- Import Account class: To work with accounts, first import the Account class from the Solana Web3.js library.
- Create a new account: To create a new account, instantiate the Account class. This process will generate a new account with a unique public key and a corresponding private key.
- Secure private keys: It is crucial to store private keys securely and never share them with anyone. Private keys grant access to account funds and should be treated with the utmost care.
- Access public keys: The public key of an account is required for various operations, such as receiving tokens or querying account balances. You can easily obtain an account’s public key by accessing the publicKey property of the Account object.
Handling Transactions on Solana
Transactions form the backbone of any blockchain network, enabling users to transfer assets and interact with smart contracts. Solana Web3 simplifies the process of creating, signing, and submitting transactions on the Solana network. Here’s a high-level overview of the transaction process:
- Import required components: To work with transactions, import the necessary components from the Solana Web3.js library, such as Transaction, SystemProgram, and sendAndConfirmTransaction.
- Create a transaction: To create a new transaction, instantiate the Transaction class and use the add method to specify the desired actions, such as transferring tokens from one account to another.
- Sign the transaction: Before submitting a transaction, it must be signed by the account that initiated the action. This process involves using the private key of the account to generate a digital signature, which serves as proof of authorization.
- Submit the transaction: After signing the transaction, use the sendAndConfirmTransaction function to submit the signed transaction to the Solana network for processing and confirmation.
By following these steps, you can create, sign, and submit transactions on the Solana network, enabling your application to interact with the blockchain and perform various operations.
Exploring the Solana Web3 API
As you continue to explore the world of Solana Web3, you will find many more features and tools that can help you build sophisticated decentralized applications. Be sure to consult the official Solana Web3 documentation, GitHub repository, and NPM package for in-depth information and resources. With the right knowledge and tools, you can harness the power of Solana Web3 to build innovative and impactful DApps on the Solana blockchain.
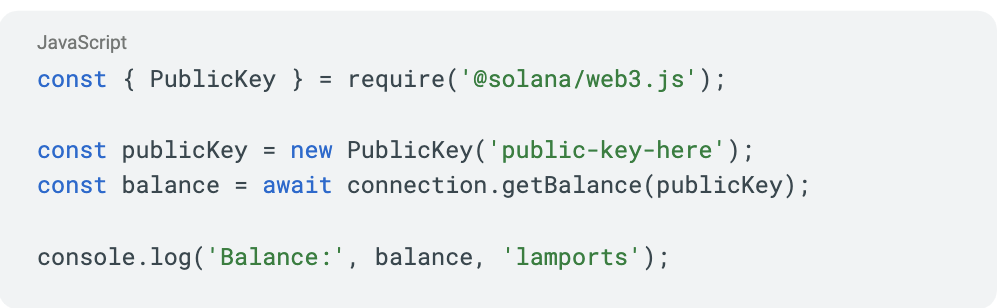
The Solana Web3 API offers a variety of functions to interact with the Solana network, such as querying account balances, fetching transaction history, and more. To access these functions, you can use the Connection object created earlier in this guide. For example, to fetch the balance of a public key:
Accessing Solana Web3 Documentation and Resources
For in-depth information on Solana Web3 and its various features, refer to the official documentation. This resource provides detailed explanations, code examples, and API reference material to help you understand and utilize Solana Web3 to its full potential.
Building a Mobile DApp with Solana Web3
Solana Web3 can also be integrated into mobile DApps, allowing users to interact with the Solana blockchain from their smartphones. To build a mobile DApp using Solana Web3, you can use popular frameworks such as React Native or Ionic, combined with the @solana/web3.js package. This enables you to create a seamless and responsive user experience across multiple platforms and devices.
Solana Web3 on GitHub and NPM
The Solana Web3.js library is an open-source project, and its source code is available on GitHub. This repository contains the library’s source code, examples, and documentation, making it an excellent resource for developers looking to contribute, report issues, or explore the inner workings of Solana Web3.
The official Solana Web3.js package is published on NPM and can be found here. This makes it easy to install and integrate Solana Web3.js into your projects using the Node Package Manager.
In this comprehensive guide, we explored the world of Solana Web3 and its various components, from setting up your development environment to handling transactions and building mobile DApps. By harnessing the power of Solana Web3 and its robust features, developers can create scalable, secure, and user-friendly DApps on the Solana blockchain.
Whether you’re a seasoned developer or just starting in the world of decentralized applications, Solana Web3 offers the tools and resources needed to build innovative and impactful projects. With its growing ecosystem, strong developer community, and high-performance blockchain, Solana is poised to be a driving force in the future of Web3 technology.
As you embark on your Solana Web3 journey, don’t forget to explore the official documentation, GitHub repository, and NPM package for in-depth knowledge and resources. With the right tools and mindset, the possibilities for creating revolutionary DApps on the Solana network are endless. So go ahead, harness the power of Solana Web3, and build your next DApp masterpiece!